A couple of days ago, I found a hole in the side of my pair of hiking boots. Instead of running out to buy new ones, I repaired them with a piece of suede leather and Barge cement.
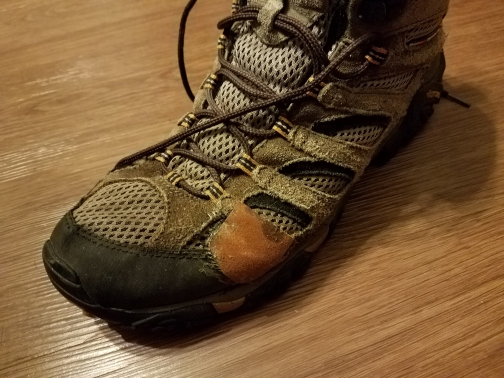
If you are anything like me, you have a favorite pair of shoes and you wear them everywhere. These are mine and I was sort of upset that they were starting to fail me. I set them aside until the next day and considered the problem.
A couple of ideas came to me. The first was that I could use an inner tube patch to repair them. The other, which I mostly settled on because of having the materials already available, was to use a piece of suede and Barge cement.
I didn’t take any pictures of how I did this, but it’s pretty straight forward.
Repair the shoe!
- Stuff the shoe with packing paper. Newspaper works too. You’ll see why later.
- Cut out a piece of suede big enough to cover the hole with 1/4 inch or so going beyond the edges of the hole. The piece I used was a little bigger than a quarter.
- With the smooth side of the suede up, place the patch over the hole and trace around it.
- Spread the Barge cement on the underside of the suede and inside the area you traced on the shoe. Be sure to cover both completely. The thing about Barge cement is it sticks to itself.
- Allow both pieces to sit for a few seconds to tack up then apply the patch. Be sure to keep it aligned with the traced area to ensure the best cement-cement contact.
- Firmly press the patch down and try to get it to conform, as much as you can, to the shoe. This is why you needed to stuff the shoe in step 1. The packing keeps the shoes shape and gives something to press against.
- Let it sit for a few hours or over night.
That’s it. Not too hard. Now, I went back and looked at my other hiking boot and saw it was wearing out in the same place. I repeated the process, but cheated a bit. Instead of pressing down the patch and contouring it, I broke out my vacuum former, well more of a small down-draft table… box… thing.
I was able to get much better adhesion and detail using this and the end of a Sharpie to contour the patch.
What do you think? Did this help you or do you have a better way? Leave a comment!
Kevin